 tessera
Screen settings
Each screen has its own settings: brightness, Dark mode, standby, night hours, going back to Home, page navigation and rotation. (Inside Home Assistant, Tessera's app is called ESP Screen Manager, and ESP Screens is its panel in the sidebar.)
You can change the settings in three places. All three change the same value:
- On the screen itself, on its settings page.
- In ESP Screens, on the Screen settings tab.
- In Home Assistant, where every setting is an entity of the screen's ESPHome device. This means an automation can change it too.
The screen stores its settings itself. They survive a restart, and the screen keeps them when Home Assistant or the app is offline. A change made in one place shows up in the other two within about a second.
Open the settings on the screen
- Press and hold the top bar of the screen for about one and a half seconds. A line grows along the top edge while you hold. To cancel, let go before it is full.
- Keep holding until the line is full.
What you'll see: the settings page opens.
You can also open it in two other ways:
- Tap a Settings tile. You add one to a page in the editor, like any other tile. It works even when Home Assistant is not connected.
- Run an action from Home Assistant. See Open the settings from Home Assistant.
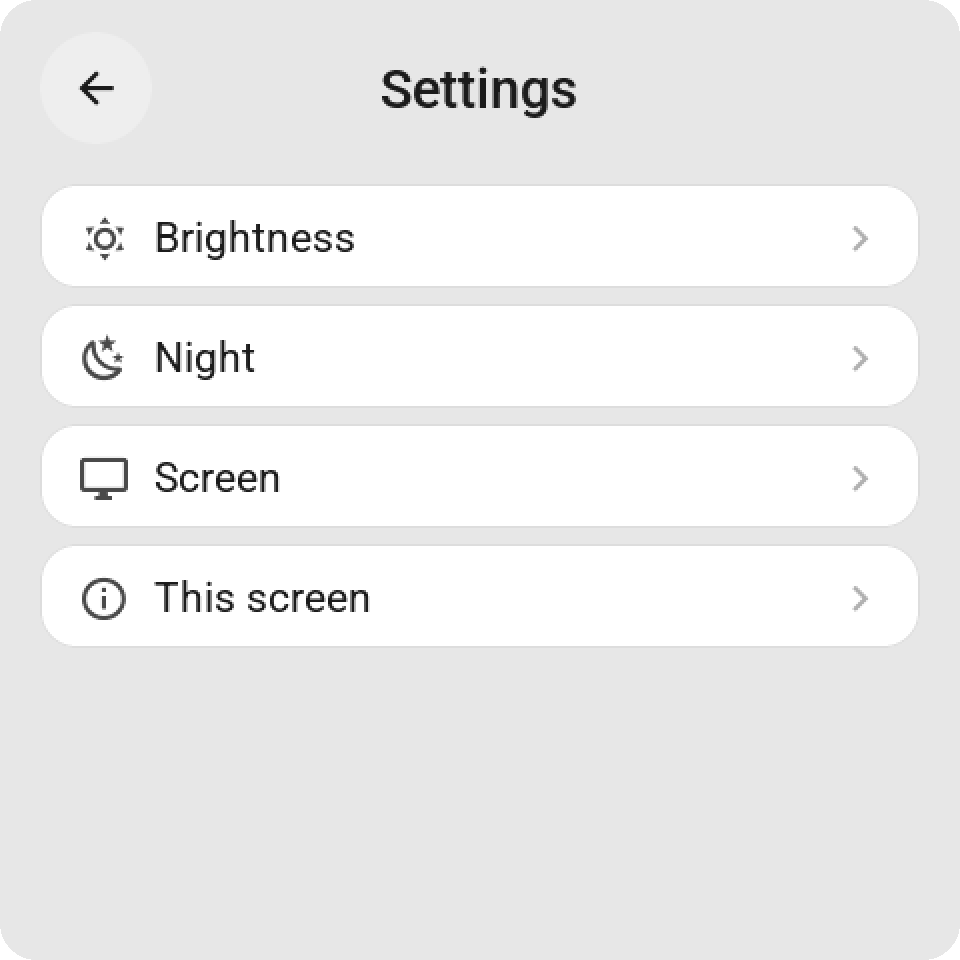
The settings page is a menu with four groups. Tap a group to open it. The round back arrow at the top takes you back to the menu. On the menu itself, it closes the settings.
| Group | Rows |
|---|---|
| Brightness | Brightness, Dark mode, Auto standby, Standby after, Standby brightness |
| Night | Night mode, Starts, Ends, Night brightness |
| Screen | Back to Home, After, Also on standby, Swipe between pages, Page buttons, Show home button, Rotation |
| This screen | Screen, Address, Firmware, Home Assistant, Calibrate touch, Restart |
How the rows work:
- A switch flips when you tap it.
- A number or a time has
-and+. Hold them to change the value faster. - Rotation shows its current angle. Tap it to go to the next one.
- A row that depends on a switch above it turns grey while that switch is off. It does not disappear, so the page never jumps around.
- If a group has more rows than fit on the screen, it gets page arrows and dots at the bottom, like the tile pages. How many rows fit depends on the size of the screen.
What each setting does
| Setting | What it does | Default | Range |
|---|---|---|---|
| Brightness | How bright the screen is while you use it | 100 % | 5 to 100 %, in steps of 5 |
| Dark mode | A black page with dark grey cards and soft white text, for a screen in a bedroom | Off | |
| Auto standby | Dims the screen after a while without a touch | On | |
| Standby after | How long without a touch before standby | 10 min | 1 min to 24 h |
| Standby brightness | How bright the screen is in standby. 0 % turns it off | 20 % | 0 % up to Brightness |
| Night mode | Uses a different standby brightness between two times | On | |
| Starts, Ends | The night hours | 22:00 to 07:00 | Any time of day |
| Night brightness | How bright the screen is in standby during the night hours. 0 % turns it off | 10 % | 0 % up to Brightness |
| Back to Home | Closes any open card and goes back to the Home page after a while without a touch | On | |
| After | How long without a touch before going back to Home | 2 min | 30 s to 1 h |
| Also on standby | Goes back to Home as soon as the screen goes into standby | Off | |
| Swipe between pages | Swipe left and right to change pages | Off | |
| Page buttons | The Previous and Next bar under the tiles. Turn it off to give the tiles that space | On | |
| Show home button | The house icon at the left of the top bar, which takes you back to Home. The Home page itself doesn't show it | On | |
| Rotation | Turns the picture. Every screen can turn upside down (180°). A square screen can also turn a quarter (90° or 270°) | 0° |
A few things to know:
- Standby and night brightness can never be brighter than Brightness. If you lower Brightness, they follow it down.
- A touch wakes the screen from standby at any time, day or night.
- Night mode only changes standby. While you use the screen at night, it is at its normal Brightness. When it goes into standby during the night hours, it uses Night brightness instead of Standby brightness.
- Keep a way to reach every page. If you turn off both Swipe between pages and Page buttons, a page can only be reached through a tile that opens it. The editor warns you when a page can no longer be reached, or when there is no way back to Home.
- The 12 or 24-hour clock is not a setting of each screen. It is set once for all screens in ESP Screens, under Settings → Language & region, together with the language and number format.
Not every screen has every row
The settings page only shows what the screen's hardware can do.
- A screen that cannot turn its backlight off has no standby and no night. The Waveshare 4.3-inch and 7-inch boards stay lit all the time, so Auto standby, Standby after, Standby brightness, Also on standby and the whole Night group are missing. They are also missing in ESP Screens and in Home Assistant.
- A screen whose backlight is only on or off has no Brightness row. Instead of Standby brightness and Night brightness, it would show two switches: Screen on in standby and Screen on at night. Today the only such screens are the same two Waveshare boards, and they have no standby at all, so you will not normally see these switches.
- Calibrate touch only appears on screens with a resistive touch panel, which you calibrate by tapping crosses: the CYD and the Hosyond 4-inch. Other screens report the exact point you touch and need no calibration.
Every other screen has all the rows.
The This screen group
This group is for when something seems wrong:
- Screen, Address, Firmware and Home Assistant show the screen's name, its network address, its firmware version and whether it is connected to Home Assistant.
- Calibrate touch starts the same calibration the screen runs the first time you switch it on: five crosses, each tapped three times. Tap the row once, then again to confirm.
- Restart restarts the screen. Tap it once, then again to confirm.
Change settings in ESP Screens
- Open ESP Screens in the Home Assistant sidebar.
- Choose the screen and open the Screen settings tab.
- Change a value. It is sent to the screen right away. There is no Save button for these settings.
What you'll see: the same Brightness, Night and Screen groups as on the screen, with the same rows. A CYD or Hosyond screen also has a This screen card with a Calibrate touch button. You are asked to confirm. Then the screen shows the crosses, for someone standing in front of it to tap.
While a screen is offline, its values show as unknown and you cannot change them until it is back.
Change settings in Home Assistant
Every setting is an entity in the Configuration section of the screen's ESPHome device. Use them in the
device page, on a dashboard or in an automation. With a screen named kitchen_screen, they are:
| Setting | Entity |
|---|---|
| Brightness | number.kitchen_screen_normal_brightness |
| Dark mode | switch.kitchen_screen_dark_mode |
| Auto standby | switch.kitchen_screen_auto_standby |
| Standby after | number.kitchen_screen_standby_after |
| Standby brightness | number.kitchen_screen_standby_brightness |
| Night mode | switch.kitchen_screen_night_mode |
| Starts, Ends | time.kitchen_screen_night_starts, time.kitchen_screen_night_ends |
| Night brightness | number.kitchen_screen_night_brightness |
| Back to Home, After | switch.kitchen_screen_back_to_page_1, number.kitchen_screen_back_to_page_1_after |
| Also on standby | switch.kitchen_screen_back_to_page_1_on_standby |
| Swipe between pages | switch.kitchen_screen_swipe_between_pages |
| Page buttons | switch.kitchen_screen_page_buttons |
| Show home button | switch.kitchen_screen_show_home_button |
| Rotation | select.kitchen_screen_rotation |
| Calibrate touch | button.kitchen_screen_calibrate_touch (only on screens with a resistive touch panel) |
In Home Assistant, Back to Home and its two related entities still carry their older name, "Back to page 1". They are the same settings.
Open the settings from Home Assistant
Run the screen's open_settings action, for example esphome.kitchen_screen_open_settings:
- Set
pageto 0 for the menu. - Set it to 1, 2, 3 or 4 to open Brightness, Night, Screen or This screen directly.
- A negative number closes the settings and goes back to Home.
Example automation
This automation turns on Dark mode every evening:
automation:
  - alias: "Kitchen screen dark in the evening"
    triggers:
      - trigger: sun
        event: sunset
    actions:
      - action: switch.turn_on
        target:
          entity_id: switch.kitchen_screen_dark_mode
For developers
Adding a new setting touches the firmware, the ESPHome packages, the app and the editor. The step-by-step recipe is in the repository: docs/SETTINGS.md on GitHub.