 tessera
Pages and tiles
A screen shows your Home Assistant entities as tiles, spread over one or more pages. You set them up in ESP Screens, the panel of the ESP Screen Manager app in the Home Assistant sidebar. This page explains which tiles there are, how to place them, and how to move between pages on the screen.
Everything here works with the current release: app 0.3.14 and screen firmware 0.3.8. If ESP Screens shows an Update for a screen, update the ESP Screen Manager app first, then update each screen.
Tiles at a glance
A tile shows one entity: one thing Home Assistant knows about, such as a lamp, a thermostat or a temperature. Tap a tile to use it. Hold it to open its full card.
In the editor, click a tile and its settings open on the right:
- Display: what the tile shows (see the table).
- Size: how many grid cells it takes.
- Direct control on the tile: keys or a slider right on the tile. This needs a Double-width tile or bigger.
- On tap: Automatic, Open control, On / off, View only or Perform action.
- Second line, Small slider on the tile, Pastel background, the icon and the name.
| Kind | Display choices | Direct control on the tile |
|---|---|---|
| Lights | Name and status, Large value | On/off switch, Brightness slider |
| Switches (switches and input booleans) | Name and status, Large value | On/off switch |
| Fans | Name and status, Large value | On/off switch, Speed slider |
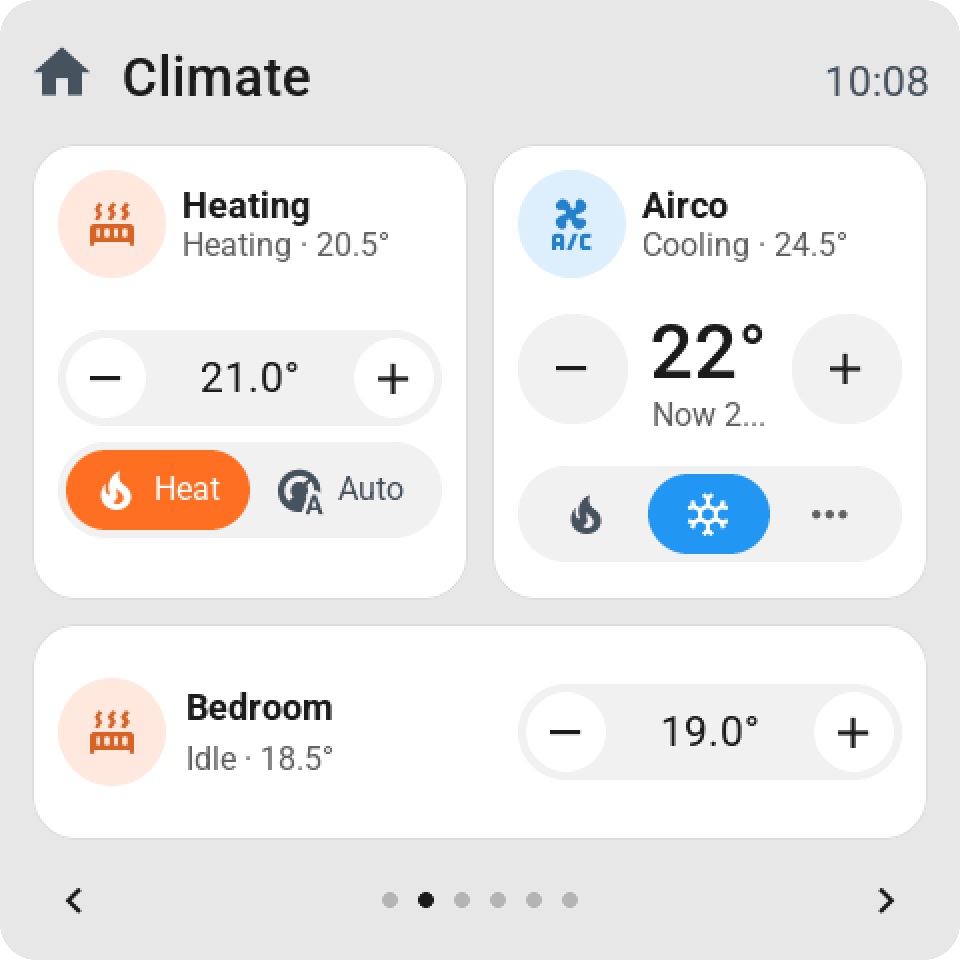
| Climate | Name and status, Large value | Temperature − / +, Mode keys, and on 1 × 2, 2 × 2 or Full page both together |
| Covers | Name and status, Large value | Open, stop, close, or Position slider, each with Slat tilt where the cover has it |
| Vacuum | Name and status, Large value | Start, stop, dock |
| Media | Name and status, Large value, Album cover | Volume and mute, or Previous, play/pause, next |
| Sensors | Name and status, Large value, Graph (1, 6 or 24 hours) | |
| Status (binary sensors) | Name and status, Large value | |
| Weather | Name and status, Large value, Weather forecast | |
| Values (numbers) | Name and status, Large value | Value − / +, or Slider |
| Selects | Name and status, Large value | Previous / next choice |
| Scenes, Scripts, Actions | Name and status, Large value | A button to run or press it |
| Timers | Name and status, Large value | Start/pause and cancel |
| People | Name and status, Large value | |
| Alarm | Name and status, Large value | |
| Cameras and images | Name and status, Live picture | |
| Sun | Name and status, Large value, Sun path | |
| Screen: Clock | Digital clock, Analog clock, Simple dial, Flip clock | |
| Screen: Settings | A plain tile that opens the screen's settings page | |
| Screen: Go to page | Opens another page (see below) |
Good to know:
- Weather forecast and Sun path need a Double-width tile or bigger. The editor widens the tile for you.
- A new clock starts as Simple dial. Flip clock and Simple dial stay readable on a small tile.
- A select (a washing machine's programme, for example) opens a list with a check at the current option. Tap another option to choose it at once. The screen shows up to 16 options.
- An alarm panel is green while armed, orange during a delay and red while it goes off. A tap opens a key for each mode, and a keypad when the panel asks for a code. When someone comes in or the alarm goes off, every screen with the tile wakes up and opens the keypad.
- A thermostat on a tile two rows tall shows its temperature between − and +, with a bar of its modes underneath. Tap the round icon to turn it on or off.
- Live picture fills the tile on every size. You can then choose Picture (Fill the tile or Whole picture), On the picture (Name or Nothing) and Refresh (every 5, 10, 15 or 30 seconds). Camera pictures work on every screen except the CYD, the Waveshare 3.5-inch and the Hosyond 4-inch. See Cameras & snapshots.
- Album cover puts the artwork in the icon's place on a normal tile. On a taller tile it sits behind the track as a dimmed background.
- Locks, device trackers, zones, counters, water heaters and humidifiers can't be tiles. You can show them in a page's top bar instead.
Sizes and limits
| Size | Takes |
|---|---|
| Normal | One cell |
| Double-width | Two cells side by side |
| 1 × 2 | One cell wide, two rows tall |
| 2 × 2 | Two cells wide, two rows tall |
| Full page | The whole page, as one big button. It needs an empty page of its own. |
Each screen has its own grid. The CYD and the 4-inch Guition have two columns of three, the Waveshare 4.3-inch has three by three, and larger screens have more cells.
A screen holds at most 8 pages and 64 tiles, whichever it reaches first. A screen with 6 cells per page gets 8 pages. A screen with 16 cells per page gets 4. The editor shows the count above the pages, for example "3 pages · 14 / 48 tiles".
There are two ways to resize a tile:
- Click the tile and choose a Size.
- Hover over the tile and drag its right edge (width) or bottom edge (height). Let go to apply it, or press Escape to cancel.
The editor only offers sizes that fit at that spot. It never pushes other tiles aside. A bigger tile shows more: a media player shows its keys under the track, a blind its position slider, and a weather tile lists the coming days one under the other.
Adding and arranging tiles
- In ESP Screens, click your screen in the list on the left.
- Find an entity in the Library on the right. Search by name, device or room, or use the filters.
- Drag it onto a cell, or click + to put it in the first free cell.
- Click the tile to change its settings.
- Click Save & send.
What you'll see: within a few seconds the screen shows the new layout. The editor shows the values Home Assistant reports right now, so you can check the look before you save.
To move things around:
- Drag a tile to another cell. Drop it on another tile and the two swap places.
- Drag a tile onto the page after the last one to start a new page.
- Drag a page by its label to move the whole page, with its tiles and title.
- Undo reverses the last change.
Adding and removing pages
To add a page:
- Click + Add page after the last page.
- Fill in the short setup: a Page title, whether to Show a Home control on this page, the Time, and any entities for its top bar.
- Add tiles to the new page.
When you start a page by dragging a tile onto it, there is no setup. The page takes its title from the room its tiles share, or from their kind when they have no room in common.
To remove a page, click ✕ beside its label, or Remove page in its settings. Its tiles go with it, and so do the Go to page tiles that led to it. The pages after it move up one place.
Page settings
Click ··· beside a page's label to open its settings:
- Page title: leave it empty to use the screen title.
- Set as Home: makes this page the Home page (see below).
- Show in page dots and swipe navigation: turn it off to hide the page (see below).
- Show a Home control on this page: the house at the left of the top bar.
- Edit this page's top bar: the items on the right of the bar.
Top bars
Every page has its own top bar: the page title on the left, and a few items on the right.
- Click the top bar of a page in the editor.
- Click + Add time, date, or an entity.
- Pick the time, the date, the analog clock, or any entity, for example a temperature or a door.
- Optional: under Show, choose Only when active to hide the item while it is off, closed, away or 0. This is handy for an open door or a running washing machine.
To use the same items on other pages:
- Open Copy a top bar.
- Pick the pages.
- Choose Items only, keep titles and Home controls or Whole bar, including title and Home control.
The copies are independent: changing one page later leaves the others alone.
If the items don't all fit next to the title, the screen leaves out the ones the editor shows dashed. Remove an item or choose a shorter title.
Moving between pages on the screen
- Page buttons: the arrows and dots under the tiles. Tap the left or right half to turn a page. A screen with only one page has none.
- Swiping: turn on Swipe between pages in the screen's settings. Then swipe in from the left or right edge. On the CYD and the Hosyond, a quick swipe across the screen does it.
- Home: tap the house at the left of the top bar, or swipe up from the bottom edge.
- Go to page tiles: a tile that opens a chosen page.
Page buttons, Swipe between pages and Show home button are in the Screen settings tab. See Screen settings.
Go to page tiles
- In the Library, choose the Screen filter.
- Drag Go to page 1 (or 2, 3, ...) onto a page.
- Click the tile and change Goes to page if needed.
A Go to page tile can be any size except Full page. A screen has one tile per destination page. When you reorder pages, the tile keeps opening the same page under its new number.
The Home page
Any page can be Home. Open its settings and click Set as Home, or drag the Home mark to another page. These all go to the Home page: the house in the top bar, a swipe up, Back to Home after a while without a touch, and the return on standby.
Hidden pages with a Back key
Turn off Show in page dots and swipe navigation for a page to hide it from the dots and from swiping. A hidden page opens only from a Go to page tile or from Home Assistant. This suits a page with more detail, like all the lights of one room.
On a hidden page:
- With Page buttons on, the bar under the tiles shows Back.
- With Page buttons off, a back arrow takes the place of the house in the top bar.
- Back returns the way you came. The house always goes to Home.
Example: Home holds a Go to page tile called "Heating", and the Heating page is hidden. On the screen, tapping the tile opens the Heating page, and Back returns to Home. Swiping from Home never lands on Heating.
Simple and Advanced editor
Simple is the editor you start in. Advanced adds a map of your pages, with lines for every Go to page link. Arranging the map doesn't change the page order on the screen. The editor warns you when a page can't be reached from Home, or has no way back.
Try navigation opens a preview where you can tap through pages and links. It doesn't switch anything in your home.
Updates and backups
Your layouts live in the ESP Screen Manager app, not on the screen. Wi-Fi and keys stay in the screen's own ESPHome configuration, and layout exports contain neither.
- Update the ESP Screen Manager app first, then update each screen. A screen with newer software (firmware) than the app shows "Configuration problem. Update add-on." until the app is updated.
- A screen with older firmware keeps working. The editor asks you to update it before you use a newer feature, such as a hidden page or a taller tile.
- If you edit in two browser tabs, the second save asks whether to load the saved version or keep yours.
On a screen with more memory (every screen except the CYD, the Waveshare 3.5-inch and the Hosyond 4-inch), the screen builds all its pages when it starts. You'll see "Preparing pages" for a second or two. After that, each page appears at once.
For how a screen is installed and added to Home Assistant, see Getting started.
Advanced: updating from an app older than 0.3.1
- Take a Home Assistant backup before updating from an app older than 0.3.1. That update converts your
layouts once and keeps the old ones in
screens.v1.backup.json. Going back to an older app needs that backup, and you lose the changes made since. - If a layout can't be carried over, the editor names the tiles it dropped. Start fresh for this screen gives that screen one empty page and leaves your other screens alone.